


Making A Blogging Template in Scrivener
The release of Scrivener 3.0 coincided perfectly with the annual task of building a new blogging template for the coming year. Here’s how I built my 2018 blogging project.
Last week the latest major update to Scrivener, version 3.0, came out. I’ve been using Scrivener since 2007 and have enjoyed watching it grow from an unknown new programme to one of the most popular applications for authors and writers. Scrivener solves the problems that made creating and managing writing projects in word processing programmes, especially the creation of books and other long form undertakings, almost untenable.
Scrivener 3.0 is probably the most exciting and substantial update so far, staying close to all the things that have made Scrivener successful, while adding a fresh look and streamlined layout.
Every December I create a new Scrivener project to manage all my blog writing for the coming year. This time I took the opportunity to explore the new version 3.0 at the same time.
The Scrivener Binder
The Binder is the folder structure Scrivener creates to manage all the documents, or text notes, in your project. This lets you jump quickly from anywhere in your project to anywhere else, and also to move things around on the fly. If you want to look up something you blogged about earlier in the year, you can just jump to the text note you wrote for that blogpost. Or, if you decide the piece you are currently working on might be better tackled later, you can move it within the order of the drafts you are working on.
I laid out the Binder in a calendar format, like an editorial brought forward file. This means one folder for every month of the year, inside of which individual text notes are created for each blogpost.
I started with 10 text notes inside each month’s folder. During 2017 I posted about 4-6 times a month but I’d like to bring that back up to 10-12 in 2018, which was my average up until a few years ago.
Each text note has its own metadata, such as target word count, label and status (more on these later). Using the contextual menu (control+mouse click) or documents>duplicate, or ⌘+D, you can duplicate the text menu and the metadata copies to the new text note. This makes it quick to set up a whole month of blank text notes that have the same target word counts and idea (or first draft) status.
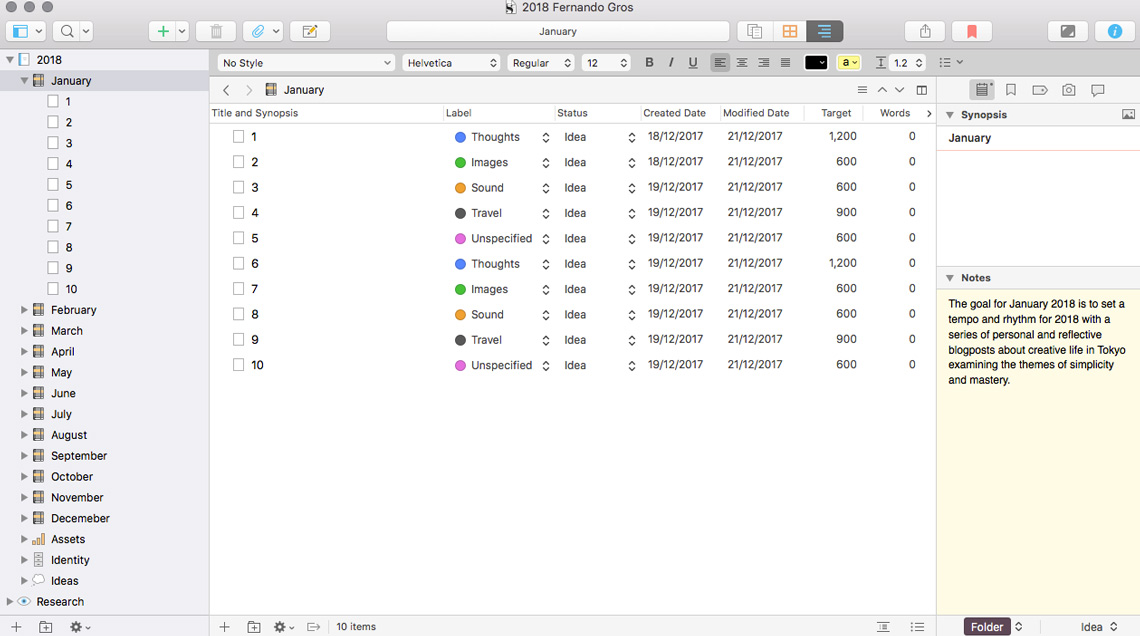
The Scrivener Outline View
At this stage I also customised the outline view’s menu bar. Scrivener lets you view the Binder’s contents in any one of three views: document view, which is for writing and editing; cork-board view, which lets you see outlines of each text note like cards on virtual cork-board; or outline view. For blogging I use only the document and outline views.
The outline view menu I like includes title (without icon or synopsis, for simplicity’s sake), label, status, created date and modified date, number of words, and target number of words. To give you some idea what this looks like in practice, here’s the outline view for this blogpost as I was writing it.

I also created a few utility folders in the Binder to help manage my blogging during 2018. Assets is a folder for all the writing that’s connected to the site and other parts of my work, like the “about” pages, product descriptions and so on. There’s an Identity folder, where I put my business plans, behavioural analyses and so on, mainly for reference purposes. Ideas is a folder for first drafts of writing that might become a blogpost, or go somewhere else, a sandbox if you like.
The folder icon is easy enough to change, either by searching the contextual menu or going to the documents>change icon. There’s quite a lot of choice and even a way to create custom icons. This year I decided to go for the orange notebook for each month, because it harked back to the Moleskine notebooks I used back when I first started blogging all those years ago.

Labels And Status
Scrivener’s Information panel is a storehouse of useful tools for writing and editing effectively. The two most important for me are Labels and Status.
I use labels to mirror the categories on my blog. This lets me see at a glance if I’ve achieved a balance between the main topics I want to write about every month.
Status also lets me track the progress of each piece of writing. Typically I write in a three-step process. “First Drafts” are just that, words dumped on a page. “Revised Drafts” are vaguely coherent, but still with plenty of mistakes and some serious editing required, and final drafts are ready for the world to see.
This year I added a few other status levels. “Ideas” are anything less than a first draft, maybe just a sentence that captures a thought, or a few notes. In 2018 I want to go back to being a little more intentional about tackling some big ideas, so this gives me a way to quickly see something that needs to be expanded.
“Sent For Editing” is, as it suggests, a label for articles that are finished and have been sent to an editor.
“Finished” is for posts that are online. I used to put posted articles into a separate folder but I’m not sure that’s the best way to track things, so for 2018 I’m going to keep everything in its month.
This might sound like a lot of work, but in practice it doesn’t take much time to do this. The benefit is how well it streamlines the process of starting to write.
When I sit down to write, which I do almost every day, I don’t have to waste time trying to figure out what to write. There are a lot of threads to pick up on, ideas to expand upon. The writing is part of a bigger process of exploration, which is a very attractive concept to me.
Project Notes and Document Notes
The way in which Project and Document Notes work has changed a little in version 3.0 but the main features remain the same. You create text-note specific side-notes and also notes and keywords that are accessible from within the inspector for every text note in your project.
I use project notes to keep a summary of my blogging goals for the year, which are the key ideas I want to explore in my writing. These are pretty broad themes, beyond categories like photography or travel. For 2018 this includes things like colour theory, mastery (how we get better at things) and simplicity (doing fewer things so we can enjoy and be better at the things we do).
Keywords make it easy to manage the tags and, well, the keywords in your writing. I’m not obsessed about having perfect SEO, but if you are, then this is a part of the process where you could really go to town. Since keywords work across the whole project, this is another way to see how the text note you are currently writing connects to other pieces of writing over the year, without having to leave Scrivener or go online.
The Toolbar
Whenever possible I try to learn key commands, but having the toolbar is handy as well. I prefer to simplify it to the features I use the most, so you can see a comparison between the default and the one I use.
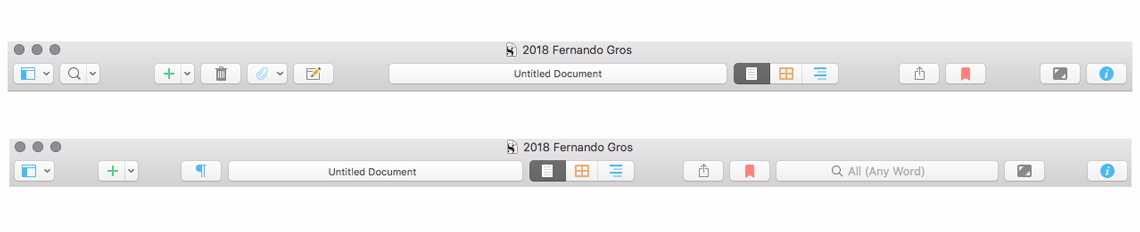
The only additions are a button for invisibles, which I like to have, to check during the final draft stage (to remove pesky things like extra spaces between words or sentences), and a full search window, mainly to check for words or phrases I’ve used in other text notes.
I toyed with the idea of adding a toolbar button for the new layouts feature, which I’m liking a lot, but it’s also available as a drop-down with the standard layouts button that lets you show and hide the Binder, rulers and format bar.
Typography
One great thing about Scrivener, and in fact about writing in any text-based editor as opposed to a word processor, is not having to think about formatting your text before you write. One particular thing that made writing in Word so infuriating was the constant prompts to format and lay out text, which just gets in the way of choosing your next word, metaphor or line of dialogue.
With Scrivener, you can set up some simple typography rules, then forget about them and focus on the writing. For me, this means lines spaced at a multiple of 1.3, with no justification or offsets, and text in 13-point Menlo, a highly readable but largely unattractive and unadorned font.
Writing in an aesthetically pleasing typeface is a bad idea. An attractive typeface is great when we’re reading, because it makes the process smoother and more enjoyable.
But when writing or editing, you don’t want to be pleasantly skipping from word to word. It should be a bit of a struggle, a battle to make the text yield and submit to your style and creative goals. A somewhat ugly, well-spaced typeface slows you down, and when you slow down you notice more of the ways in which the writing can be improved.
Full Screen Composition Mode
Typically I bang out first drafts in standard document view mode. But I do the bulk of the “make it better” work, the second and third drafts, in Full Screen Composition mode, which in Scrivener 3.0 now looks extra sexy.
Full Screen Composition (enter it either with ⌥+⌘+F or the icon button on the toolbar) creates a distraction-free writing environment. Back when I was pumping out well over 150 blogposts a year, I used to write everything in a distraction-free editor called Write Room, which had a wonderful green on black, old-school vibe. Full Screen Composition in Scrivener 3.0 is not as retro as that, but it has the same kind of benefits, blocking distractions and helping you to focus solely on your text.
I like to enable Typewriter Mode, which keeps the line you are writing centred on the screen and scrolls what you have written up and away from you, like a sheet of paper going through a typewriter. This mode takes a little getting used to, and some people seem to hate it, but I find it stops me from having to scan the page when I’ve stopped typing to see where I am.
As for other settings, I have the Full Composition Mode view set to 125 per cent, centred, in a fairly narrow window (about 25 per cent on the slider), and with full background fade out. There are plenty of options here to change the colours, add textures to background and so on, but I’m happy with it as it is, straight from the box. Just blur out the background and let me write!
A Few Thoughts On Blogging Workflow in Scrivener
One of Scrivener’s big strengths is the way it lets you organise your writing project as a set of smaller, independent documents which you can quickly move to, edit and organise. Writing a book in Scrivener is much more manageable than, say, creating one huge document in a conventional word processor, or trying to piece together several documents that live independent lives in the file structure of your computer.
This might not seem as important for bloggers, since every post could be a distinct and independent piece of writing. For a long time that’s just how I approached it, and before that I wrote everything straight into WordPress (or other platforms before that). Some bloggers probably still do the same.
But if you are exploring certain themes again and again, trying to write ahead of time because it’s less stressful, or working to some kind of editorial calendar, being able to use Scrivener to plan and lay out your writing, in much the same way that a magazine might be run according to an editorial calendar, is powerful.
And, just as Scrivener allows you to break your whole project into manageable parts, it allows you to do the same for individual blogposts. It might seem like overkill to break a 1,200-word blogpost into smaller text notes. But one good rule of writing is: the smaller the segment you rework, the better your writing will be. Scan up and down a long article with lots of paragraphs and it’s easy to get lulled into an “It’s OK” state of mind. Break it down and the problems come into focus.
In order to read the article as a whole, just shift_click all the text notes and Scrivener shows them to you in one scrolling page. Or maybe you’d like to look at your introduction and conclusion at the same time, using the split layout mode (view>editor layout>split horizontally or view>editor layout>split vertically).
Once you start writing a draft it’s easy to split the document at any point you choose (documents>split>split at selection ⌘+K).
The way I like to do it is to split at locations where I want to include a heading. Then I write the heading, and use split at the location with the selection as a title (⌥+⌘+K). This creates a new document with the selected text as a title.
This also makes it easy to move blocks of text around in an article without any cut and paste gymnastics.
While writing this blogpost, which was always going to have a lot of sections and subheadings, it was easy to play with the order of things just by dragging text notes around in the binder.
When it comes time to send the article off to be edited, I just use “compile” (⌥+⌘+E, or the compile icon in the toolbar) to export an rtf file of the whole piece. At the moment, I don’t have any compile rules set up, but I want to explore how to add html heading formats to the headings at some point in the future.
Bonus – The Tweet Folder
The target setting allows you to specify a goal for each text note. Normally this is expressed as words, and I happen to use 600, 900 and 1,200 as typical word goals for the different kinds of blogposts I write.
But you can also set character length goals as well, which means text notes can be a great way to draft out tweets!
This could get a little crazy but one of my goals is to write less on Twitter while trying to be more effective. And with the new changes, the expanded 280-character limit, and the ability to post threads in one hit, the platform is inviting us to be more writerly in our approach.
I want to make use of that.
So, being able to draft the tweet for a blogpost at the same time as finishing a post, while offline and thus not tempted to drift into a Twitter time-suck, kind of makes sense.
Conclusion
This is the first project I’ve undertaken with Scrivener 3.0 and it was a lot of fun to create a new blogging project and explore the updated features. I’ve saved this as a template so it will be easy to create a new project for 2019.
If you’d like to know more about using Scrivener, please leave a question in the comments. And if you’ve like to try out my blogging template for yourself then please click the download link below
Click to download the Scrivener 3 Blogging Template
If you’d like to read some further articles about writing please check out Rene Girard And The Need To Edit Our Work and More Thoughts On Writing First Drafts